Combo Intro to 3D Geometry and 3D Modeling
Learn CAD Skills by Building 2D and 3D Models
Course Description
A good understanding of 3D geometry is required in robotics, engineering, science, architecture, arts, game design, and in many other areas. In this course trainees begin by learning how to manipulate objects in the XY plane and in the 3D space using geometrical transformations, as well as to create their own designs. Its main objective is to help trainees develop spatial reasoning skills (“thinking in the 3D space”).
The course goes on to apply this 3D geometry knowledge to the learning of CAD (Computer Aided Design) skills that are highly sought-after in robotics, architecture, design, engineering, and many other areas of Industry 4.0.
Trainees create and manipulate 2D and 3D shapes by typing simple commands.
Trainees learn Constructive Solid Geometry (CSG) actively by building 2D and 3D models. They begin with simple 2D shapes and gradually progress to complex 3D models. Their models are automatically checked and trainees receive useful real-time guidance, which helps them learn most efficiently. As a result, trainees acquire advanced CAD skills along with visual-spatial reasoning skills, and ultimately they become prepared for a smooth transition into advanced commercial CAD systems.
At the end of this course, trainees create a capstone 3D model of their own choice under the supervision of an NCLab instructor.
The companion CAD App in NCLab allows trainees to create their own 3D models, save them in their user accounts, export as STL files for 3D printing, and even share with others online.
This illustrative video shows how 3D shapes can be created easily by typing simple commands:
Complex 3D models can be built easily by combining and manipulating 3D shapes:
Constructive Solid Geometry (CSG) Concepts Taught:
- Create, color, and display 2D and 3D shapes
- Move shapes in the 2D plane and 3D space using vectors
- Rotate shapes in the 2D plane and 3D space using angles
- Scale shapes in the 2D plane and 3D space
- Subtract objects from each other, create unions and intersections of objects
- Use axial, planar and rotational symmetry to simplify designs
- Use the properties of finite shapes to control accuracy and efficiency
- Identify repeating patterns and exploit them to simplify designs
- Exploit repeating patterns, and automate designs using the Python for-loop
- Create rotational Bezier solids, surfaces and shells
Required Background
This course requires middle school geometry and keyboarding experience.
Equipment Requirements
Internet access
Email and Browser
Course Structure and Length
This course is self-paced, and trainees will practice each skill and concept as they go. Automatic feedback is built into the course for both practices and quizzes.
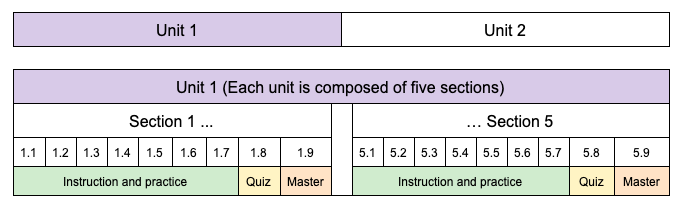
The course is divided into five Units, and each Unit is composed of five Sections. Each Section consists of 7 instructional/practice levels, a quiz, and a master (proficiency) level. Trainees can return to any level or quiz for review.
Trainees will need approximately 80 hands-on hours, based on their ability level, to complete this course. Since the course is self-paced, the amount of time required to complete the course will vary from trainee to trainee. Trainees are responsible for learning both the tutorial content and the skills acquired through practice.
Unit 1 (Basic Concepts of the XY Plane)
Section 1 (Points)
-
The X and Y axes, axes compass.
- The grid, and the width and height of objects.
- Units of length.
- Areas of simple shapes (squares, rectangles, parallelograms, triangles and trapezoids).
- Calculating areas of complex objects by decomposing them into simple shapes.
-
Points in the XY plane and their coordinates.
- Distance between points which lie on a line parallel to the X or Y axis.
- Distance between points which do not lie on a line parallel to the X or Y axis, theorem of Pythagoras.
- How to use Python as a simple command-line calculator.
Section 2 (Vectors)
- Vector and its magnitude.
- Multiplying vectors with numbers.
- Adding and subtracting vectors.
- Vector as the difference of two points.
- Adding vectors to points.
- Using vectors to move points and entire objects.
Section 3 (2D Shapes)
- Creating squares, rectangles, triangles, quadrilaterals, circles, rings, and regular polygons with the PLaSM language.
- Working with intervals.
- Using vectors to move objects in the XY plane.
- Making copies of objects.
- Displaying multiple objects together.
- Creating unions of objects.
- Subtracting objects.
Section 4 (Angles and Rotations)
- Angles on the clock.
- How to rotate 2D objects in the XY plane about the origin [0, 0].
- That positive angles mean positive (counter-clockwise) rotation.
- That negative angles mean negative (clockwise) rotation.
- How to rotate objects about their vertices.
- How to rotate objects about arbitrary points in the XY plane.
- How to combine rotations and translations.
- Practice rotations and translations by solving Tangram puzzles.
Section 5 (Prisms)
- What are prisms.
- Many 3D objects that trainees already know actually are prisms.
- How to create a prism with base b and height h in PLaSM.
- How to create various types of prisms including cubes, rectangular prisms, cylinders, tubes, and prisms based on an arbitrary 2D base in the XY plane.
- How to define lines parallel to the X and Y axes.
- How to split objects along lines parallel to the X and Y axes.
- How to create rectangles at arbitrary positions in the XY plane.
- How to create complex 3D geometries by combining prisms.
Unit 2
Section 6 (2D Shapes I)
- What is CSG, scripting CAD, and PLaSM
- All commands and keywords of the PLaSM language are uppercase
- Every object has a default initial position
- Use predefined colors
- Create squares, rectangles and circles
- Assign colors to objects, and display objects
Section 7 (2D Shapes II)
- Create rings, points, triangles and quadrilaterals
- Display multiple objects together
- Subtract objects
Section 8 (2D Shapes III)
- Create regular polygons and boxes.
- Create unions of objects
- Extrude 2D shapes to 3D as prisms
- Create advanced 3D objects by combining prisms of different heights
Section 9 (2D Translations)
- Learn how to translate (move) objects in the XY plane
- Move objects in the X direction
- Move objects in the Y direction
- Move objects in the negative X direction
- Move objects in the negative Y direction
- Move objects in the X and Y directions at the same time
Section 10 (Applications)
- Practice previously learned concepts by building advanced 2D models
- Create copies of objects
Unit 3
Section 11 (2D Rotations)
- Learn how to rotate objects in the XY plane by playing Tetris
- Positive and negative rotation
- Rotation about the origin (0, 0)
- Rotation about an arbitrary point in the XY plane:
- Center of rotation inside the object
- Center of rotation on object’s boundary
- Center of rotation outside of object
Section 12 (Applications)
- Practice 2D rotations and translations by building Tangram puzzles
Section 13 (3D Shapes I)
- Learn first 3D objects and build simple 3D models
- Create spheres, cubes, cylinders and cones
Section 14 (3D Shapes II)
- Create pipe-like objects (tubes, pipes, 3D rings etc.)
- Create boxes and toruses
Section 15 (3D Translations and Rotations)
- Learn how to rotate and translate objects in the 3D space by playing Tetris 3D
- There are six possible rotations in the 3D space
- Z-axis rotations are the same as XY-plane rotations
- Right-hand rule
- Special cases of rotations discussed separately:
- Rotation point is inside the object
- Rotation point is on object’s boundary
- Rotation point is outside of object
Unit 4
Section 16 (Applications)
- Practice 3D rotations and translations by creating a variety of 3D objects related to sports
- Create truncated cones and arcs
Section 17 (Exploiting Symmetry I)
- Learn how to exploit axial and planar symmetry to simplify designs
- Mirror 2D objects about lines parallel to the X or Y axes
- Mirror 3D objects about planes that are perpendicular to the X, Y or Z axes
- Exploit multiple symmetries in one design
Section 18 (Exploiting Symmetry II)
- Learn how to exploit rotational symmetry to simplify designs
- Combine axial / planar and rotational symmetries
Section 19 (Applications)
- Solve spatial puzzles in order to develop their spatial reasoning skills
Section 20 (Applications)
- Practice previously learned concepts by building advanced 3D models related to movies
- Scale (shrink or stretch) 2D and 3D objects
- Erase parts of objects
Unit 5
Section 21 (Curved Surfaces)
- Curved surfaces are represented via straight triangles, and how to take advantage of this fact to create new shapes
- More accurate surface representation leads to larger data files and increased memory and computing time
- Make computations faster by reducing the number of sides in cylinders and cones
- Create elbows (elbow = part of a torus)
- Create new objects by reducing the number of facets on elbows and spheres
- Create intersections of objects
- Boolean operations are more efficient when objects have fewer facets
Section 22 (Spirals)
- Create spirals by revolving a given 2D object in the XY plane about the Y axis with a given angle of revolution, and elevation gain per one complete turn
- Create a rail to a staircase
- Create helical screw blades for a meat grinder
- Create a nut with thread, and a double-helix DNA model
- Create a minigolf obstacle
- Complete a freeway intersection
- Build a slide for children’s playground
Section 23 (Design Automation I)
- Identify repeating patterns and exploit them to simplify models
- Python for-loop
Section 24 (Design Automation II)
- Use Python for-loop to automate simpler designs
- Create color bars with changing colors, stars of gradually increasing heights
- Create a pyramid by stacking rectangular prisms of gradually decreasing diameter
- Create a round staircase
Section 25 (Design Automation III)
- Use design automation for advanced projects
- Build a railroad with many wooden ties
- Build a spoked wheel, and a snowflake
- Build a flower with many petals
- Build a clock with minute marks
- Build a sophisticated double-helix DNA model using balls and sticks